
A practical guide to drysuit maintenance, from leak detection to valve and seal repair
Diving exposes the body to conditions it cannot survive unprotected. Water pulls heat away from the body far faster than air does, so the right exposure suit is not optional gear, it is life support. For cold water diving, that usually means a drysuit.
A wetsuit lets in a thin layer of water that the body warms up. A drysuit works differently. It seals the diver inside a gas-tight shell, and an undergarment underneath traps air for insulation. As long as the suit stays sealed, it keeps the diver dry and warm. The moment it leaks, that protection breaks down.
Find Where the Water Is Coming In
The first step is figuring out where the suit is letting water through. Pay attention to exactly where you feel wet: around the neck and shoulders, on the upper arm, near the wrist, across the chest and stomach, on the thighs, or pooling in the boots. Water can travel inside the suit before you notice it, so the spot where you feel wet is not always the spot where the suit is actually leaking.
Pressure-Test the Whole Suit
Once you have a general idea of where the problem might be, a pressure test will confirm it.
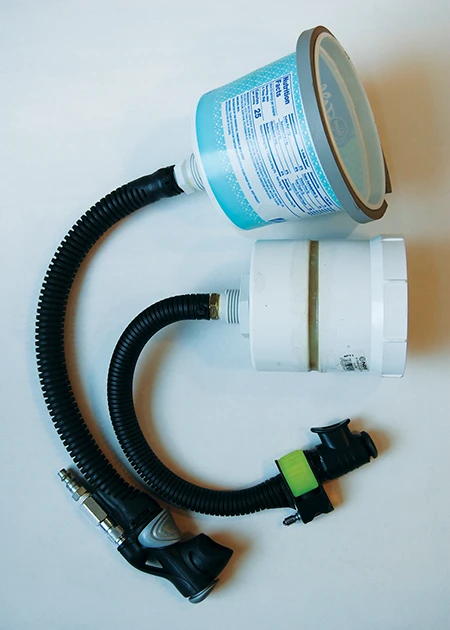
To test the suit right-side out, block the neck and wrist openings so air cannot escape. A plastic food container or mixing bowl works well for the neck, sealed in place with electrical tape. For the wrists, a soda can or a smooth, teardrop-shaped bottle with the label removed makes a good plug. Zip the suit closed, shut the exhaust valve, and connect a low-pressure inflator hose. Inflate the suit until it is taut.

Mix a detergent solution at a ratio of about 1 part detergent to 100 parts water, and spray it over the entire suit, front and back, using a spray bottle or garden sprayer. Cover the zipper, the inflator and exhaust valves, the seals, the seams, and the boots and gloves. Wherever bubbles form, mark the spot with a grease pencil, then flip the suit and mark the same spot on the inside so you know exactly where to repair it. Rinse the suit in fresh water afterward and let it dry completely.
You can also test the suit inside out, which puts the inflator fitting on the inside of the suit. This takes a bit more setup, since you need to pass the wrist plugs into the sleeves and rig a neck seal dam (a BCD inflator fitting or similar air fitting works) before reaching in through the neck to zip the suit closed and bring the dam through to the outside. Once everything is sealed, inflate and test it the same way.
Check the Valves
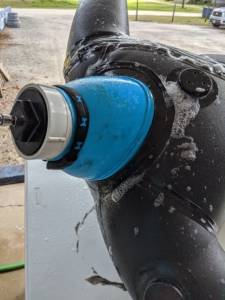
If the leak is near the inflator or exhaust valve, the first thing to check is whether the valve itself has worked loose. As a rule of thumb, a wet upper arm usually points to the exhaust valve, while a wet chest usually points to the inflator. Get in the habit of checking that both valves are tight before every dive. Tightening methods vary by brand, so follow the manufacturer’s instructions for your specific suit.
Valves also need periodic servicing. The O-rings inside an inflator valve wear out over time, which can let water in or cause the valve to free-flow air. Debris caught on an O-ring can make a valve stick. To check a valve, connect it to a low-pressure hose, turn on the air, and submerge it in water or spray it with the detergent solution. Watch for bubbles, and never press the inflator button while the valve is underwater.
If you see bubbles, debris is the likely cause. Disconnect the valve from the hose, soak it in warm diluted detergent, and work the button while it’s submerged to loosen anything trapped inside. Rinse it through with fresh air and fresh water, then reattach the hose and test it again. If bubbles still appear after cleaning, the valve needs attention from a trained technician, or replacement.
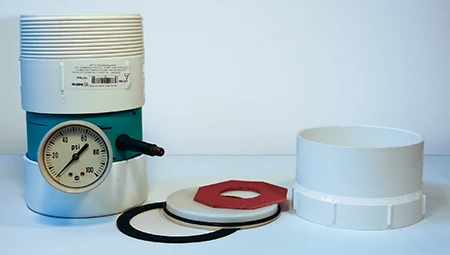
Exhaust valves fail for the same reason, usually debris. Soak the valve, set it to its easiest exhaust setting, and flush water through it while pressing the purge button. Check for a filter as well, and clear out anything trapped in it. A pressure chamber can be used to test the valve more rigorously; bubbles during that test mean it needs service or replacement.
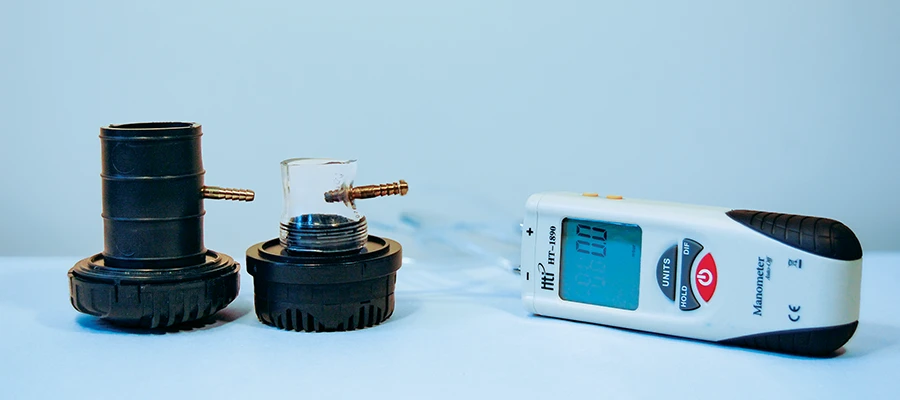
You can also measure an exhaust valve’s “cracking pressure,” meaning the pressure at which it opens and closes, using a simple mouthpiece adapter connected to a manometer. A healthy valve should read somewhere between 0.4 millibars (0.006 psi) when open and 25 millibars (0.36 psi) when closed.
Check the P-Valve
If your suit has a P-valve, first work out whether the wetness is actually water or urine, since the cause and the fix are different. Water usually points to a loose bulkhead fitting. Urine usually points to a poorly fitted catheter or a worn valve, both of which routine maintenance can prevent.
To test the P-valve, block the exit and apply gentle positive pressure through the catheter adapter, either by mouth or with a syringe. Spray the valve, tubing, and fittings with the detergent solution, or submerge them, and look for bubbles. Clean, seal, or replace whatever is causing them; manufacturers often sell rebuild kits for this.
To check the valve’s one-way mushroom seal, unblock the outlet and block the balance valve with your thumb instead. Apply gentle negative pressure through the catheter adapter. If air gets pulled through, the valve needs cleaning or replacement.
Check the Seals
Seals are one of the most common sources of leaks. Latex and neoprene seals lose their elasticity over time, and oxygen, UV light, ozone, and oils all speed up that breakdown. Seals that are glued to the suit have to be cut away and replaced when this happens. Silicone seals hold up better against UV and chemical exposure and are generally easier to work with, but they tear more easily than latex and cost more.
Many newer suits use modular, quick-change seal systems that let you swap out a worn seal yourself in the field, without sending the suit out for repair. If your suit can be retrofitted with this kind of system, the cost usually pays for itself after the first seal replacement.
To check a seal in the field, block the opening (by pinching it, taping it, or fitting it over a bottle) and pour water in to look for drips. Or twist the sleeve to build a little pressure inside, then spray it with detergent solution or dunk it in water and watch for bubbles. The same approach works for testing arm and leg sections.
Small holes or tears in latex seals can be patched with latex scraps and latex adhesive; duct tape works as a temporary fix in a pinch. Neoprene seals can be repaired with neoprene cement. Silicone seals, unfortunately, don’t have a reliable repair product, so a damaged silicone seal usually needs replacing.
For tears or pinholes in the suit fabric itself, a urethane sealant such as Aquaseal works well. It’s flexible but not stretchy, so it’s best applied to leaks in seams rather than areas that flex a lot. Repairing from the inside of the suit, rather than the outside, gives a cleaner finish.
Check the Gloves
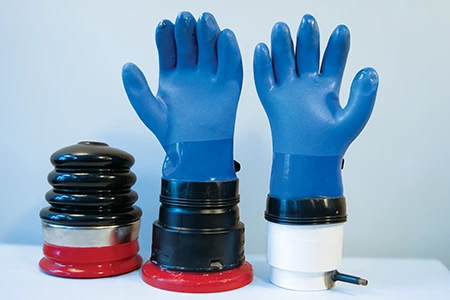
Dry gloves can leak too, and the test is simple: fill the glove with water off the suit and watch for drips, or seal the open end, roll it to build pressure, and spray or submerge it to look for bubbles. Purpose-built glove testers are available commercially, or you can build a simple one yourself.
To repair a glove, mark the leak, turn the glove inside out, and let it dry fully if you tested it wet. Apply Aquaseal to the marked spot, let it cure, then repeat on the outside before testing again.
Habits That Extend a Drysuit’s Life
A few simple habits go a long way toward keeping a drysuit healthy for years.
Lubricate the zipper after every dive, using wax for a brass zipper or silicone grease for a plastic one. Trim any loose threads on a brass zipper and gently heat-seal them with a soldering iron to keep the seal tight. Clean the zipper teeth occasionally with detergent and a soft brush.
Wash latex seals with detergent and follow up with a protectant. Wash the outside of the suit to remove salt and dirt, and the inside to control odor. If your suit has a P-valve, flush it after every use to prevent urea crystals and bacterial buildup, both of which can damage the valve or cause infection over time.
A little routine care after every dive is what keeps a drysuit doing its job: getting you out of the water warm and dry.
Adapted from “Tools for a Healthy Drysuit,” originally published by Divers Alert Network (DAN)

Operations and Marketing Manager at Diventures, holds an advanced diver certification and writes outstanding articles for both the website and digital publications. She contributes to every step of the process with her creativity and organizational skills.